|
Imperial Productions
®
FAQ (Frequently Asked Questions)
Columns, Capitals, Bases
|
Fast
Track |
Definitions |
Design
Questions
|
Install
Questions |
|
Material
Questions |
|
|
|
These notes are written to the benefit of the reader
as general guidelines written without prejudice. They are intended to
provide practical knowledge based suggestions only. Consult with your
local contractors, architects or structural engineers when applying load
bearing notations. Always perform your projects by complying with local
building codes. |
|
Definitions
- ie Column Lingo
|
|
|
What
is the Difference between
Tapered & Non-Tapered Columns |
|

 |
The taper of
a column creates a visual distortion to those that view the columns from
afar. This is known as the entasis of a column whereby the taper
ends 2/3rds down the shaft and the balance is straight. The renaissance
artists knew about visual distortion especially denoted by the size of
the hands in Michelangelo's statue of David from 1501 to 1504 that was
placed atop a building. The hands were larger than expected to correct
for the placement of the statue at a high level making it look normal
from the ground. This learned visual distortion applied to a
column (ie the taper) corrects for the apparent narrowness of the
non-tapered column - it simply looks wrong from afar - thus it is
corrected by the taper. |
|
Should
I pick Tapered or Non-Tapered
Columns ? |
|
Simple Answer:
For modernism Non-tapered will look like posts. This provides a
simple look to a facade
or deck structure.
For a
traditional look use Tapered Columns. The taper
provides the visual distortion necessary for the column to look proper. Keeping
within the design principles of PHi,
ie "the golden rule" there should be approximately a
1/3rd to 2/3rd ratio variation between the
top of the column and the bottom diameter.
Example:
Top diameter of the shaft is 10", the bottom is 16", height 10 Feet.
The taper should stop 2/3rds down the shaft, then go straight to the
bottom. This can vary
per manufacturer. On a 10 Feet high shaft the taper would stop approximately
at the 7-1/2 Feet level. Using the calculation of Phi .618 the
taper would stop at
6.18 Feet level, then go straight. The use of the 2/3 - 1/3 rule is mostly
used by manufacturers rather than true Phi.
|
|
What
is a Load Bearing Column |
|
Column that hold
load from an upper lintel carry the load from the top of the shaft to
the substrate. It is vital that load bearing columns be centered under
the lintel and not moved to one side. The load must be evenly
distributed down the shaft to the substrate. It is critical that
the substrate be level at all points of intersection with shaft.
Especially take care that when cutting a column to a specified length
that the cut is at an even horizontal distance at all points of
intersection with the substrate.
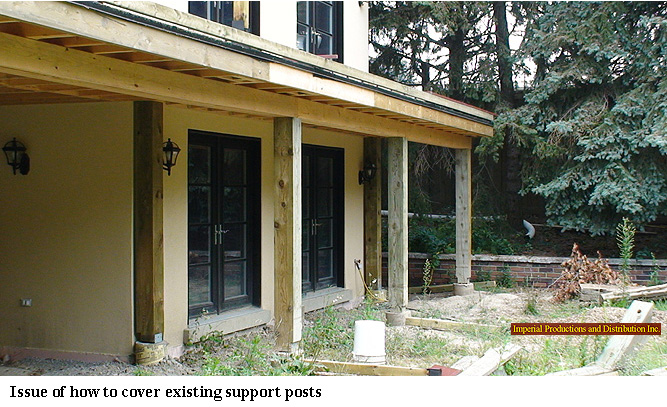
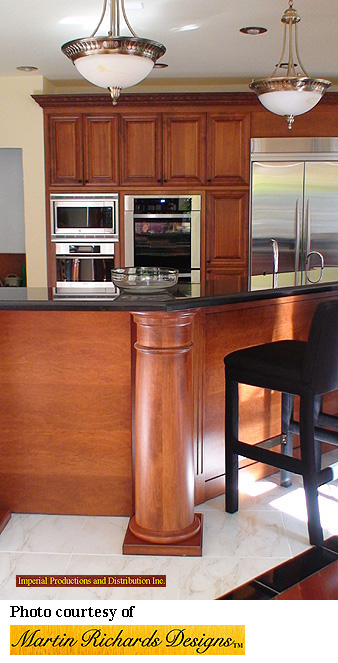
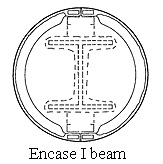 Columns that a
purely decorative cover the interior load bearing posts as seen below.
The column cover must be large enough to encapsulate load bearing
posts. One can select
Split for Post Wrap for reassembly around the load post. Load posts
can be metal or wood. Columns that a
purely decorative cover the interior load bearing posts as seen below.
The column cover must be large enough to encapsulate load bearing
posts. One can select
Split for Post Wrap for reassembly around the load post. Load posts
can be metal or wood.
Always consult with
your own structural engineer when installing load bearing columns.
|
|
What
is an Engaged Column |
|
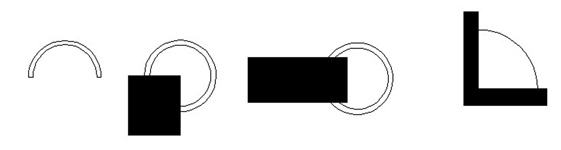
Half
Outside Corner
Wall Cover
Inside Corner |
Columns that are
split for pilaster applications are considered to be engaged to the
surrounding wall. The engagement can be a 50-50 split known as a
half column or it can be split as a percentage of the circle area. Other
splits wrap a wall end or cover an inside or outside corner |
|
What
is the difference between Fluted and Reeded |

 |
Fluted Columns
have concave vertical lines running down the length of the shaft,
whereby Reeded columns have convex lines running down the length of the
shaft |
|
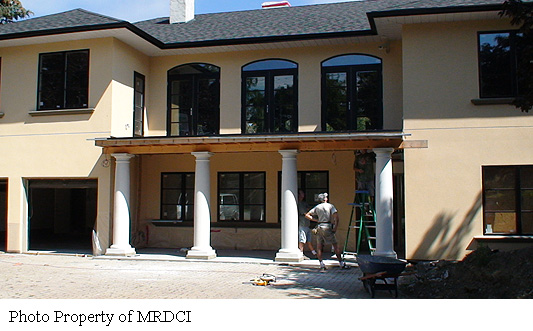
How
Big Should a Column be ? |
|
 |
Simple Answer:
Most people undersize their columns, creating a pole effect
on a porch or
deck area.
It is
important to maintain a design ratio between the
columns
size and the house or office as seen in the photo.
|
|
What
is a part Fluted Column |
 |
These Columns are
derived from Neo-Classical Renaissance variations. The bottom third of
the column is fluted as seen in the photo taken by me in Amsterdam.
The capital is Corinthian and the column is engaged to background wall -
it is not a full column and is purely decorative
MartinRichards |
|
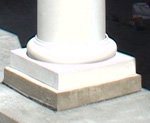
How
to Measure
the Bottom of a Column Shaft
for replacement base |
|
Take a string wrap
the bottom of the shaft and provide us with the
length of the string which
is the circumference
of the shaft to sit on the base. The base top
flat should be 1/2" larger than
the shaft
bottom.
|
| How
to Install Load
Bearing Columns |
 |
Explore this
article on how to install FRP-PolyComp load bearing columns. |
|
Preparing
the Substrate ? |
|
FRP-PolyCompTM
& Fiberglass - Round & Square Columns Install Notes
It is
vital that the substrata be strong enough to support
a) the weight
of the columns
b) dead
structural loads applied (ie 2nd floor or deck)
c) horizontal
loads such as wind and earthquake
d) variable
loads such as snow or ice
|
|
 |
There must be
an adequate foundation poured from
concrete to
hold the types of loads as described.
Portland
cement is advised and depths vary per locale.
|
|
 |
For a poured patio
around the columns employ
rebar in the
concrete for support and avoid cracking
|
|
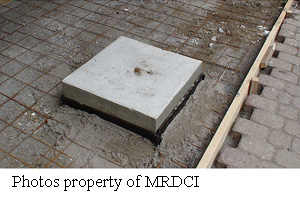 |
The Pad.
Create
a pad for the column shaft to sit on.
Ensure
it is perfectly level. This pad is separate from
the
poured patio so that it has an independent foundation.
|
|
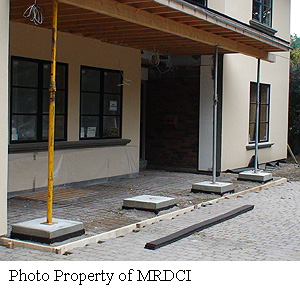 |
Install a
gasket around each pad before adding the
concrete deck
- the black material as shown in the
photo beside
stops pressure of expansion or contraction.
|
|
Temporary
Supports ? |
|
PolyCompTM,
FiberCompTM
& Fiberglass - Round & Square Columns Install Notes
|
|
|
In order to
slide the columns into place use loly or jack posts to
temporarily
hold the load of the lintel above.
Once secure
and slightly higher than the shaft to be put in place,
slide the
columns into place on the level foundations.
When the
temporary post is removed the lintel will lower
ever so
slightly on the dead middle of the shaft.
|
|
Installing
the Columns ? |
|
PolyCompTM,
FiberCompTM
& Fiberglass - Round & Square Columns Install Notes
|
|

|
Load bearing
columns are those that are Whole and NOT split for
reassembly or pilaster applications. Once split
they cease to be load bearing.
If the columns
are sold as load bearing they are rated by the manufacturer
and all static and non static loads should be assessed by
the architect or structural engineer. Always have your project
inspected by the City.
It is vital
during placement of the shaft that it is placed directly DEAD CENTER to
the dead load applied (ie the lintel).
Load is borne on the
shaft not the capitals or bases as the free float. Any variation
to the application center load will subject the column shaft
to an uneven amount of weight on one side of the shaft
resulting in possible breakage or cracking.
Also ensure
that 100% of the bottom of the shaft is sitting evenly on the
substrata.
|
|
Securing
the Columns ? |
|
PolyCompTM,
FiberCompTM
& Fiberglass - Round & Square Columns Install Notes
|
|
 |
The base:
Once the
shaft is in place slide the base up the shaft about 1 foot up the
shaft and wedge it temporarily with a shim.
To prevent
horizontal movement from winds and earthquake it is
necessary to secure the bottom of the shaft to the substrata. We
recommend consulting with Simpson Strong Ties for your particular application. "L" angle iron are not a wind uplift
device. You can leave the base detached or use silicon to secure
them to the substrata.
|
|
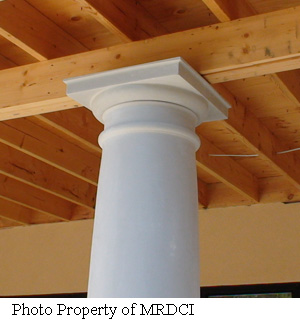 |
The Capital:
As stated
before the load is borne on the shaft only. The capital
is purely decorative and should be attached with screws
by pre-drilling a pilot hole and counter sinking screws on 4
sides.
Cover the
screw head with poly Spackling Compound or in the
case of fiberglass car Bondo.
|
|
Finishing
Notes |
|
for FRP-PolyCompTM,
Fiberglass - Round & Square Columns
|
|
|
|
Once in
place, we recommend using a wet wash cloth to remove any surface dirt.
Once dried use 200 grit sandpaper to remove any raised areas.
Remove any powder with a damp cloth prior to painting
|
|
What is the ArchPolymerTM? |
|
 |
Simple Answer:
Like a synthetic
wood
It is not a
cheap plastic really looks like plaster but is
lite weight and easy to
install.
They come
primed and need to be painted.
Interior &
Exterior use.
ArchPolymerTM
meets class A fire rating only when it is
on Custom
special order to have the fire retardant put into
the
material mix or fire barrier primer can be applied in 3
coats.
This is a requirement in some jurisdictions or
commercial
buildings such as offices or places of worship.
|
|
click
for Full Details & Architectural Material Data Sheet |
|
What is the
GRG-NeoPlasterTM? |
|
 |
Simple Answer:
Like a traditional
plaster but heavier and less fragile
for packing.
GRG-NeoPlasterTM
is Class A fire rated.
Priming and
painting by others. Interior Use
<- Watch the
Video
|
|
|
<-
PDF Install Instructions
for
PolyComp Load Bearing Columns |
|
click
for Full Details & Architectural Material Data Sheet |
|
Can
I specify custom Fiberglass Columns ?
|
|
Yes
Our FRP-PolyCompTM
Series is the only Fiberglass that can be customized.
They are
available in Square or Round
sizes.
You can
specify the height and variable cuts for post wrap or pilaster
application.
Select from
inside corners, outside corners, wall wraps, or engaged variations.
Remember any
split column ceases to be load bearing.
This applies
to Round and Square columns
|
|
Can
I specify custom Sizes on Hardwood columns ? |
|
 |
Regardless of
species, any hardwood column can be
custom made.
You can
a) Specify
the exact height within 1/8"
b) Specify
the diameter on round columns
c) On tapered
columns specify the Entasis or variance
between the top of the shaft and the bottom of the shaft.
Most columns are made to a 2/3rd taper and a 1/3rd straight
to the bottom.
d) Split hardwood columns can be ordered for post wrap
or pilaster (engaged) column applications.
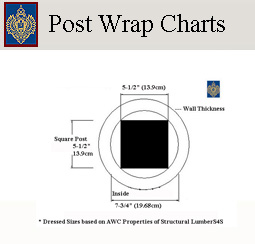
Remember
the walls are
approximately 1-1/2" thick on
either side when considering post wrap.
e) Refer to
our page - click below for the post wrap page
|
|
Can I use any
wood outside?
|
|

For historic homes, Imperial
offers
exact duplication of
rotted
columns.
|
No. The
following woods are good for outside use.
Pine:
This wood has inherent properties to ward off rot.
Knotty Pine:
Before painting Knotty Pine you need to seal the
knots with
shellac to avoid the knots from bleeding any
remaining sap
in the wood.
Western Red
Cedar: Like pine it has inherent anti rotting
chemicals in
the wood.
White Oak:
It is the
hardest wood that we offer making it very strong.
The issue of
white oak is that it will turn grey and dark overtime.
|
|
About
Decorative Hardwood Columns & Bases |
|
Hardwood
Columns
These are
sold as decorative columns only. They are not intended to be load
bearing although they do hold
load on the 1-1/2" wide walls. You can order hardwood columns
to be load bearing with
a solid wood core. Rely on your structural engineer for
advise.
Hardwood
Bases:
These are
load bearing as they are made from solid wood staves. Use exterior
woods like Pine, White
Oak, Western Red Cedar for Bases. They are made from two parts a
square and a round
section. All parts can be customized.
|
|
 |
If columns
need to be prepared for outside use
<= Here is a
helpful article
|
Back to Main Column Page
|
How to Order Products 1-800-399-7585
+1-416-264-6096
email:
sales@imperialproductions.com |
|
 
 |
|
* All Prices & specifications in this website subject to change without
notice |
|
* Prices are
net, Freight, Taxes & Duties charged where applicable
otherwise client is responsible for remittance |
|
* Measurements are approximate only, Final Product may vary from this
website |
|
COPYRIGHT MRDCI Martin Richards Design and Contracting Inc, Martin Richards DesignTM
and Imperial
Productions® Feb 2018 all rights
reserved
|
|
Last
Update NOV-25 |
|